


Lighting Plans – A Cinematographer’s Blueprint
- Mar 13, 2019
- 5 min read
It might not come as a surprise to those of you, who follow me regularly on my blog here, that I have created another round of lighting plans! This time, however, for our Poppie project.
My Previous Learning
As I’ve blogged about previously in my blog entry How Cinematographers Block for Filming, and as also pointed out by Youtuber Jay from CinematicJ, lighting plans are really blueprints for anyone working in the camera or lighting department, as they not only inform about the setup of the location itself, but also of the exact location of lights, camera and actor positions, in short, of the blocking of a scene.
Thus, the benefits of creating lighting plans are:
They aid easy communication throughout the camera and lighting department as a well organised lighting plan entails all the relevant information and are handy as well as easily readable for everyone who requires them on set.
They prevent you from forgetting even the smallest details or lights
They force you to think about the lighting setup of every scene and every shot, down to the nitty-gritty stuff such like access to power supplies.
Thus, they make issues – like lack of space or power plugs – more apparent before you even set foot on set.
They prevent you from having to make a lot of creative decisions on the day
Thus, they free up your mind for the more important tasks at hand on the day of filming
Challenges Ahead
With this project – and apart from my previous location recce – I was furthermore able to look at images of our café/lounge on the Internet in order to inform and update myself on the location at hand as well as its specs. While a location recce can (and should) help determine whether a location would make a good film set at all, you can still end up forgetting bits and pieces of information pertaining to it.
And although taking notes, photos or even sound snippets may aid you in memorising the amount and location of power plugs, furniture, windows and doors, you might not always be able to take notes or pictures or to film especially in public areas, due to reasons of confidentiality and personal rights of image.
Since we furthermore cannot have free access to any of these locations apart from the quick location recces that we were gladly able to conduct, it was obvious that we would not be able to go in and have lighting tests then and there.
Furthermore, the sheer amount of planned shots in this project, which consists of approx. 175 shots and 10 scenes in total, will be a challenge to plan for in detail, especially in regard to time. Since I will not able to recreate the exact blocking of all 175 shots within the challenges and time frame that I am given, as this would mean going through every shot Lynley and I storyboarded and seeing whether I would need to drastically move any of the lights or change the setting completely.
In this regard, however, I was lucky to implement a trick that I picked up from the cinematographer I worked with on the short film Girl Fight in January and which I will explore in the following.
A Cinematographer’s Hack
For whilst I was working as a 2ndAC on his set, I realised that – once a scene was set up for the master shot – he never changed (or ‘cheated’) – the lighting aspect for any of the tighter shots that would subsequently occur in this scene. Even though we would subsequently move in closer to our actors to capture mid shots, MCUs, CUs etc., he would not change it as he had let it set up in a way in which the camera would not interfere with it and e.g. cause shadows to fall onto the actors or the scene in general.
And although it always took a lot of time for the initial setup of each and every scene, we made up for it in the long run as his setups were stylised in a way that avoided minor tweaks of lighting – and thus loss of time and a higher possibility of inconsistencies – throughout the scene.

What an admirable ability!
My Current Application
Thus, I wanted to try and implement this approach by myself to see how it worked for Poppie’s by creating general lighting plans for each location that would reflect the overall setting. As this project is the biggest one I shot so far, this way to go about lighting setup will carry the advantage of saving us time both in pre-production as well as in production.
As I already blogged about in last module’s blog entry on lighting, I have again become more efficient and quicker in creating the lighting plans using the ShotDesigner software. Applying the cinematographer’s hack above, I felt that this was setting us up well in regard to our time schedule and amount of shots.
For this, I’ve attached the first and second draft of my lighting plans here:
First Draft:


Second Draft:


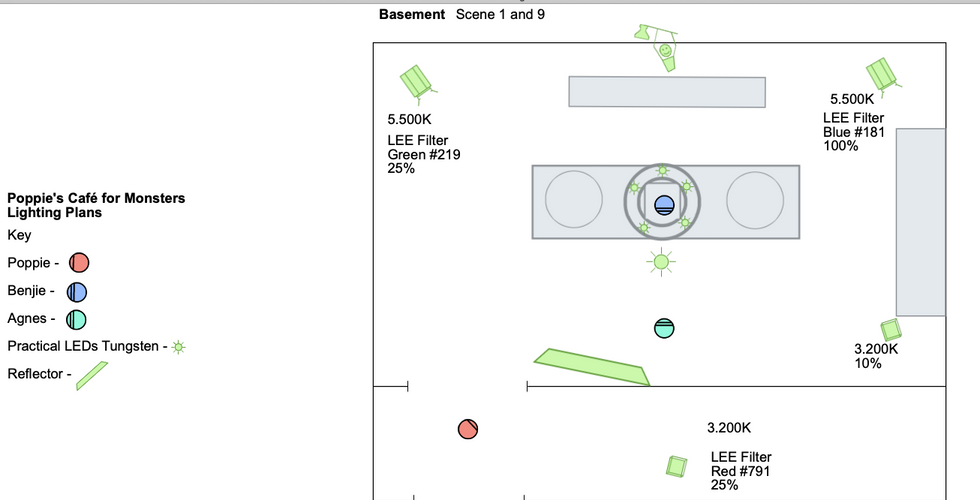


The second draft is a result of lighting tests that Lynley and I conducted. For this, we explored the lighting settings – such as colour temperature and intensity – of the LEDgo studio lights in tandem with a number of colour gels in order to find the right colour for the intended mood of each scene and noted down their respective associated mood.


Thus, for example, with using the LEE green gel #738 at a 5.600K setting and with 100% intensity, we noted down ‘really leavy green’, whilst we associated the same gel and colour temperature at only 25% intensity with ‘sitting under a tree during summer’. With the LEE blue gel #181 at 5.600K and 100% intensity, we associated ‘rays of moonlight’, whilst the LEE green gel #219 at 5.600K and 100% signalled us ‘sickly’, ‘nausea’ and ‘contaminated room’.
After going through the various permutations of gels and settings, Lynley decided on using the gels and settings as described in my second lighting plan.
However, since we were not able to test these settings under the original circumstances on location, these values are just intended approximations and I will most likely have to tweak some of the settings on set and inevitably upload my final lighting plans – aka the actual lighting outcome – once principal photography is done.
Let’s see how this attempt runs down.
Update from 14 April 2019
Now that principal photography is over and done with, I’ve recreated the original lighting scenarios that we ended up actually using on location and compiled them into this final lighting plan for the sake of completion and for better understanding of the lighting choices that I made on set.


As always, plans rarely unfold the way they were originally intended to. But at least they make for splendid learning opportunities.
References:
4 Eye Media Works (2017) How to block a scene | Film Making | 4 Eye Media Works [online] https://www.youtube.com/watch?v=SIsscxAmfBI&index=149&list=WL&frags=pl%2Cwn [Accessed on 13 March 2019]
CinematicJ (2016) How to Explain Blocking to Your Crew [online] https://www.youtube.com/watch?v=QJ-EprSMp9Q&index=130&list=WL&frags=pl%2Cwn [Accessed on 13 March 2019]
Hartle, S. (2018) How Cinematographers Block for Filming 15 November 2018. Svea Hartle SveaExMachina’s Blog [online] https://sveahartle.wixsite.com/sveaexmachina/single-post/2018/11/15/How-Cinematographers-Block-for-Filming?fbclid=IwAR0zF_YezHMCtvEM5EAsLjsJbKfb5ewM5GmPidgQcSDYRnQ4cPVf7QId1_o [Accessed on 13 March 2019]
Hynes, M. (2019) Girlfight [online] Goldmyne Films: UK
Jared Isham (2017) Basics of Blocking in Filmmaking [online] https://www.youtube.com/watch?v=5KTiGgLLJIw&index=149&list=WL&frags=pl%2Cwn [Accessed on 13 March 2019]
StudioBinder (2018) Film Blocking Tutorial – Filmmaking Techniques for Directors: Ep3 [online] https://www.youtube.com/watch?v=9AGaECt9j4g&frags=pl%2Cwn [Accessed on 13 March 2019]
The Film Look (2018) How to Block a Scene | The Film Look [online] https://www.youtube.com/watch?v=M0NBodzdAEg&list=WL&index=149&frags=pl%2Cwn [Accessed on 13 March 2019]
Comments