


Camera Tests: Of Jibs and the Void from Stranger Things
- Jan 19, 2020
- 12 min read
Last week was filled with a variety of camera tests for both projects of Gilly and Pillars that required some thought, a lot of experimentation and much attention to detail in order to be pulled off to some degree.
And while the camera tests on Pillars will the be subject of another blog entry in the future, today’s blog will revolve around the camera tests for The Tragic Case of Gilly O’Connor.
The Jib Shots
As I already blogged about in my blog entry “How to Make A Horror Film: Introduction Into The Tragic Case of Gilly O’Connor”, this story deals with a Celtic girl named Gilly who was called to exorcise a demon from a garden but fails in her mission, and is subsequently chased by him. As she tries to get rid of him, she sadly fails again, ending with the demon pushing her over a steep cliff into her death.
At this point the script says “She [Gilly] screams as she falls, her vision flashes between the demon’s face above her and the tops of the cliff”. From this description, it was obvious that a POV-shot of Gilly falling off of a cliff would be needed or at least preferred.
Well…. Since hauling a camera operator and their equipment off a cliff is not what I would call proper Health and Safety standards, especially in regard to the fact that we are still a student production with limited budget, I realised that this shot needed particular attention.
Research into Jibs, Cranes, and Drones
As such, I conducted some research into possible solutions. Since we needed to replicate a fall from a certain height, and replicate it in a safe and believable way, it was obvious that the use of a jib or crane would most likely be required – what other piece of equipment would provide us with enough height and controllability?

Granted, drones could have been another theoretical solution, but I quickly ruled that out for the following reasons:
Our university doesn’t own a drone.
Drones –especially with the right camera and/or power to lift a certain camera weight – are expensive beyond our budget.
Even renting a drone would not only be costly, it would also legally require two people who are certified to operate a drone – one steering and observing it and the other watching the footage.
Or it would require to rent specialists with a certificate, which would be beyond our budget as well.
Although there is some spectacular drone footage out there that was taken before the drone crashed, their falling trajectories don’t look like the POV-shot of a person falling.
Even if you tried filming that shot with the help of a drone, the footage would look too smooth and artificial.
Furthermore, you would be limited in tilting the camera backwards, as this would tilt the entire drone with its rotors backwards, causing it to stop functioning.
This is especially important if you consider the gruesome physics of falling people. Only think about the picture “The Falling Man” from the terror attacks of 9/11, taken by the photographer Richard Drew (you’ll have to make due with remembering it or looking it up yourself as I am not including this image in my blog for reasons of reverence): Since the head is the heaviest extremity of the human body, a falling person will inevitably fall backwards and/or flail, which is what we needed to replicate in order to make this fall of our main character believable.
Lastly, another law of physics comes into play that needs to be addressed – acceleration. Since any falling body will accelerate its speed the longer the body falls, our replicated shot also needs to become quicker towards the end. Whilst a crashing drone would undoubtedly solve this issue if you were ready to crash-land it, a jib would allow much more control and be less of a strain of budget as well.
For these reasons, I discarded the idea of using a drone for the time and budget being and started looking at jibs and cranes instead.


Looking deeper into the matter of jibs, mini cranes, and cranes in the further course of my research, I remembered that our university had a jib stored away. Now, since there are many different types of jibs – and thus many different tutorials on them – I decided to have a lesson on how to setup a jib.
And:
Thus and following the watch of this tutorial, I arranged a session with our technician demonstrator to show us how to set up that jib and to have a go at our imagined shot.
The Setup at University
Thus, we started off by putting the jib together in its longest configuration – which consists of three arms (or pieces of arms) and a lot of screws, washers, and safety chains in total.
For this, I made sure to take a photo of every single step in the setup to be able to remember and replicate it later:


As you can glean from the images above, we started with assembling the three arms first, thereby making sure that all screws are tightened, washers fitted, and nothing wobbly. We then made sure that all parts providing the handle for the tilt would be aligned to one side, as the handlebar would not fit otherwise. After attaching and tightening the cable, we then proceeded onto collectively lifting the jib onto its stand before attaching the camera to the head.
The Experiments
From then on, we started with our experiments. Since our main character Gilly is being pushed over the cliff backwards, and thus her trajectory would go in a backwards curve from her point of view, we put the camera backwards onto the jib to replicate that trajectory.
As Hannah will be the camera operator for this project and I will be the DoP, we decided that she operates the lift of the jib (and thus the height, the velocity and the acceleration), whilst I operate the tilt of the camera (and thus the framing). As such, we decided that Hannah would decide on mark and pace and that I would have to adapt to it to match up with the framing.
In order to getting used to the jib and its operation, we’ve practised a couple of cycles like shown above. This was also helpful in regard to our individual timing, as it allowed me to getting used to Hannah’s motions and thus knowing when and how to tilt the camera to match up with that.
Since replicating the acceleration of a fall is crucial to this shot – but difficult to achieve with a jib without crashing the camera itself – we decided to also test whether this could be replicated by recording a clip during the lift of the camera, and then reversing the clip back in the edit. Thus, at least in theory, it would be possible to lift the camera off the ground in a quick pace. Although this would then require us to steadily decelerate whilst rising the camera, we figured that this test might be helpful to see which motion would be easier to accomplish.
However, it quickly turned out that it was more difficult to achieve than the previous setup, and this was for two reasons:
As we lifted the camera, it was really hard for Hannah to lift the camera quickly off the ground and to then consistently decelerate against Earth’s gravity.
It was also harder for me to get the timing of camera tilt right as, by lifting the jib arm, I had to turn the tilt handle quicker than Hannah lifted the jib arm, and this also against gravity.
This made the shot look strange and really artificial in some places and jittery in others, so we forfeit the idea and instead considered repeating that test in the right order with a proper crash pad.

Next up we experimented with different focal lengths and different speeds (25fps and 50fps), which – due to the first – sometimes resulted in hilarious results. The first round of shots was done by using a focal length of 24mm. Whilst these shots looked nice, I still felt that they were a bit too artificial and too wide a field of view for the human eye – at least for the intended POV-shot.
Jib Test Shots, Pt.1: Operation of A Jib
Thus, we decided to proceed through the available focal lengths of the vario-lens we had attached to the camera – except gravity had a different opinion about that. In order to gauge the effects of different fields of view with this particular shot, Chloe would adjust the focal length of the lens after each attempt. However, after the practise run of 24mm, 35mm, and 50mm, Chloe suddenly realised that the camera came back down with the setting on 24mm – the lens had collapsed during each lift due to gravity.
Since we didn’t have camera tape on us, and no access to a manned stores to obtain some (or at least a lens kit of prime lenses), we decided that taping the lens (or using primes) would have to wait for the next round. As such, we only ever repeated the 105mm focal length in a test, as this was the longest option of the vario-lens that – sort of – locked the lens into its place.
Going through the motions again and watching the footage back, the 105mm focal length looked a lot more convincing and closer to human perception than the other focal lengths did. Furthermore, due to the space distortion of the focal length, the fall looked like it was much quicker and the distance much longer than what it originally was.
Jib Test Shots, Pt.2: Lens Experimentation on a Jib
SMLXL
Now, watching the footage back on camera, two other issues to be aware of were, firstly, the fact that this last shot worked because it was filmed in the studio against a wall and with a lighting rig above that served as reference points during the fall. Thus, we feared that this shot might not look like anything at all if we filmed it against a (blue) sky or against the cliff, so we noted this down as another test to be done soon.
Secondly, because of us filming “backwards” on the jib in order to replicate the trajectory of the fall, we furthermore needed to be careful with the angle of the shot, so that neither Hannah, nor I, nor the jib would appear in shot.
The Void - Attempts
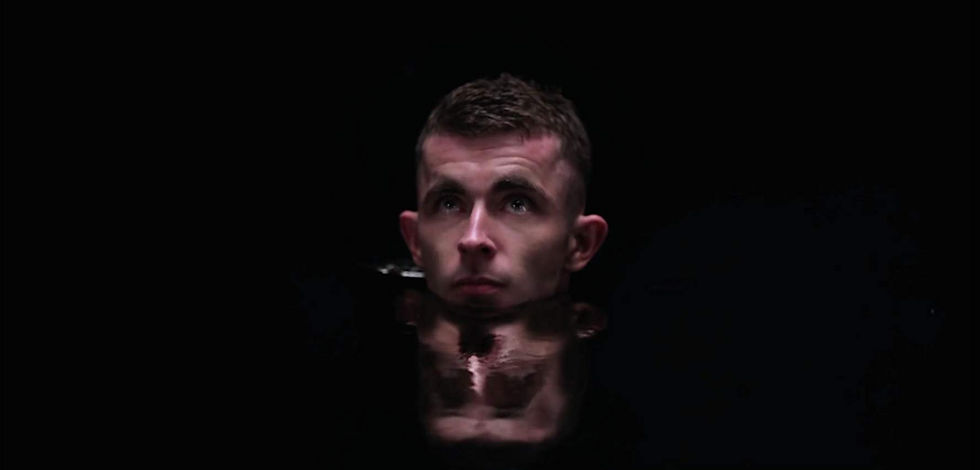
The next test shot, which we then practised on Wednesday, was an attempt at recreating the Void scenes from the Netflix series Stranger Things, which I already mentioned in my blog entry “How to Make A Horror Film: Introduction Into The Tragic Case of Gilly O’Connor”:
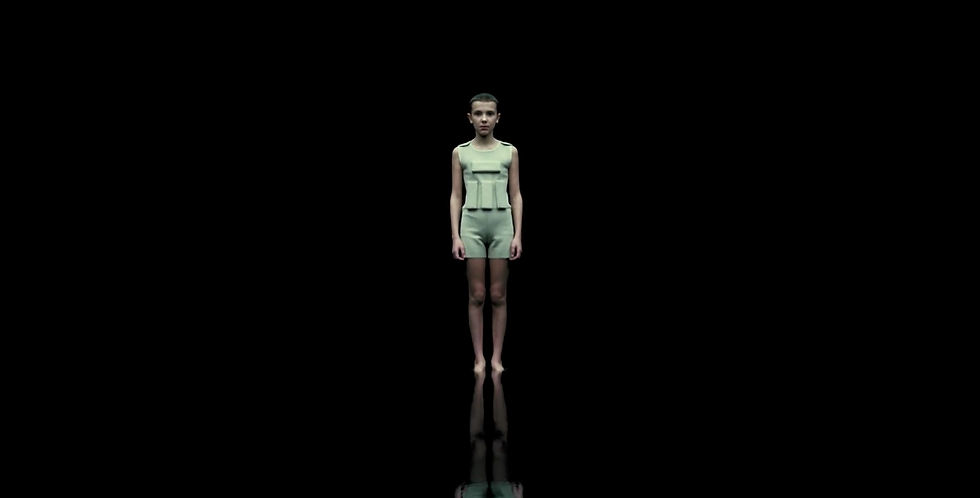
This trick took a bit of time to research, as there was not much research about on this particular test and effect. Whilst there is a lot online on recreating a void with the use of a green screen, the only available sources that wrote about how the directors of Stranger Things achieved the effect was done by non-academic sources.
Whilst the Internet was teeming of green screen solutions for this effect, there were also a couple of issues with them:
1. In order to make this solution look like the original shot, there was a lot of postproduction work and production space needed.
However, researching a bit more, I found out that this effect was already pulled off once before by the horror film Under the Skin (2013):
As such, and following more research, I found out that the directors of Stranger Things replicated the setup of the original scene and disclosed their setup in an interview, providing the following image from production:

As such, the following requirements for the setup proved to be:
Overhead flicker-free lights that have been softened by scrim along almost the entire ceiling.
Black curtains around the walls, stretched flat so that they don’t create any shadows.
Black lining on the floor (assuming pond-liner) formed to a pool and filled with two to three inches of water to create reflection.
They furthermore provided images in camera and after editing to show the difference, thus outlining the postproduction process, which included increasing the contrast and decreasing the saturation of the image.

Along with this, Lachlan Milne, the DoP of Stranger Things, provided a testimony on the recreation of the void-scene by adding the following useful tip:
“The biggest thing is to try and keep light off it, because it’s easy enough to pull the blacks into the grays. You have to pull the blacks down, but it affects the overall contrast of the scene,” he says. “If there happens to be a little bit of light that bleeds through on the background, it turns what should be black into a mild gray. The real key is to keep as much light off the background as you can, and make sure that you fill out your foreground with enough detail so that when you actually put more contrast in the final image, you don’t lose the detail or your foreground to contrasting.”
With this preparation in hand, I went into the studio on Wednesday and prepped for the day. Since we will not be able to create a pool and flood the studio with the amount of water required for our production, I purchased black bin liners to blacken out the floor. Whilst this will not create a reflection (and thus might be required to be entered manually in post), it was a good first approximation in terms of colour and luminance.
After that, and since I researched the green screen solution as well, I asked our technician demonstrator to help set up the washers, daisy-chain them, and feed them into the DMX for better control. Apart from the fact that I will need the skills I learned from that setup for Pillars of Creation (this will be the subject of another blog entry), I wanted to use green light to amplify the green in the background and help it stand out for the editor to work with properly.
Since the most complicated shots with green screen are naturally the wide establishing shots (and we have some of them) I decided to test these as the “worst case scenario”. In order to be able to assess the spread of light against our green screen in camera, I followed the tip of our technician demonstrator to apply the False Colour Function of our Camera in order to have the luminance spread read out on the screen and thus assess the position of all the lights.
However, this information proved to pose a problem for us, as the colours of the False Colour Function indicated that the spread was not only very uneven, but the intensity was as well, making this a feed to Chroma key in the edit without grain.


After testing a couple of different setups, I immediately realised that green screen would not be a feasible solution for our intentions, as the reading still showed us uneven spread and underexposed as well as overexposed areas in the green screen – with the lights being positioned in the middle of the studio.
Being confronted by this fact, it was immediately obvious that we would not be able to pull of the widest shot that we required. As we needed almost the entire space of the studio diagonally, and the lights were already in the middle of the room, it was obvious that our actors would have to walk across the lights; which would then interfere with the exposure of the green screen.
Because of these issues, and the risks to Health and Safety, I decided that the green screen option would not be useful for the recreation of the void scene and instead moved onto recreating the scene in the style of Stranger Things and Under the Skin. For this, I used our house lights and the fact that they were already softened, pulled the curtains around and set up for the widest shot.

Whilst it would, no doubt, have been another feat to rig the LEDgos on our rig, I refrained from doing so for two reasons:
Our university sadly doesn’t have as many LEDgos as would have been required to evenly light the room without leading to bright spots. Even with the spread function of the LEDgos, I would have required 15-20 LEDgos, strategically placed across the rig and set to the widest setting, in order to illuminate the required space adequately.
The rig is furthermore suspended and thus a lot lower than the actual ceiling where the house lights are attached to, thus giving me even less space to work with and to improve the spread issue.
Whilst achieving this setup was not possible with the time and means at hand, I decided to keep spotlight illumination as an option for later steps in the process in case postproduction was not able to recreate the effect like our source make it seem like or in case our actor/objects would require more illumination.
After setting up, we filmed some sequences in order to not only assess spatial needs, but also issues of framing and other issues that might pop up during the tests. These clips were then passed onto our editor for editing and assessment, and the results will be published here as soon as they have been updated:

In the meantime, I will tend to the next array of tests to ensure that all works out as planned.
References:
Bruce Philpott. (2015) Enable Your Jib to Do More [online] Available at: https://www.youtube.com/watch?v=RJdnZKJg-K0 [Accessed on 10 January 2020]
Fast Feed Editorial Staff (2019) Stranger Things Behind the Scenes: 5 Hidden Facts [online] Images taken from: https://blog.frontier.com/2019/07/hidden-facts-stranger-things-behind-the-scenes/ [Accessed on 10 January 2020]
Glazer, J. (2013) Under the Skin [DVD] Switzerland, UK, and USA: Film4 et al.
Guang Zong (2016) Camera Crane Jib [online] Available at: https://www.youtube.com/watch?v=iO0YjhKnfAE [Accessed on 10 January 2020].
Hannah Flear. (2020) First Camera Test With Jib. [online] Available at: https://www.youtube.com/watch?v=QvmMtKGkxLk [Accessed on 5 February 2020].
HarvestMediaMinistry. (n.d.) How Drones Are Changing Video Production [online] Image taken from: https://www.harvestmediaministry.com/how-drones-are-changing-video-production/ [Accessed on 10 January 2020]
Huls, A. (2019) Discover the Real-World Visual Magic Behind ‘Stranger Things’ Season 3 [online] Image taken from: https://blog.pond5.com/24770-discover-the-real-world-visual-magic-behind-stranger-things-season-3/ [Accessed on 10 January 2020]
Hutchinson, S. (2016) How ‘Stranger Things’ Created the Void [online] Images taken from: https://www.inverse.com/article/19121-how-stranger-things-created-the-void-with-old-school-effects [Accessed on 10 January 2020]
Junod, T. (2016) The Falling Man. An Unforgettable Story. [online] Available at: https://www.esquire.com/news-politics/a48031/the-falling-man-tom-junod/ [Accessed on 10 January 2020]
PannyHire.co.uk. (n.d.) LIBEC JB30 JIB ARM KIT [online] Images taken from: https://www.pannyhire.co.uk/product/libec-jb30-jib-arm-kit/ [Accessed on 10 January 2020]
Ro, C. (2019) These Behind-The-Scenes Shots Of The Void In "Stranger Things" Will Make You Say, "I Can Never Look At It The Same Now" [online] Images taken from: https://www.buzzfeed.com/crystalro/stranger-things-void-real-life [Accessed on 10 January 2020]
Skypower (n.d.) Aerial Drone Filming Homepage [online] Images taken from: https://www.skypower.co.uk [Accessed on 10 January 2020]
Skypower (n.d.) UK and Worldwide Drone Photography Services [online] Images taken from: https://www.skypower.co.uk/services/drones/?gclid=CjwKCAiA66_xBRBhEiwAhrMuLZi_P60K5kBGRukPToGGSiHymOMXu0_4TxjTwkahsAYSlFOwtqe9GxoCbfEQAvD_BwE [Accessed on 10 January 2020]
Stranger Things [Netflix] 15 July 2016. Images taken from: https://www.imdb.com/title/tt4574334/?ref_=fn_al_tt_1 [Accessed on 20 January 2020]
Stranger Things Wiki (2017) The Void [online] Image taken from: https://strangerthings.fandom.com/wiki/The_Void [Accessed on 10 January 2020].
Svea Hartle. (2020) Jib Test Shots, Pt.1: Operation of A Jib (January 2020). [online] Available at: https://youtu.be/yj4s9_dvxtI [Accessed on 24 May 2020].
Svea Hartle. (2020) Jib Test Shots, Pt.2: Lens Experimentation on a Jib (January 2020). [online] Available at: https://youtu.be/8sxnUAQbHk4 [Accessed on 24 May 2020].
Comments