


In Equilibrium: Balancing the Ronin-M and Ronin-S Gimbals
- Feb 9, 2020
- 11 min read
In regard to our FMP productions of "The Tragic Case of Gilly O’Connor" and "The Pillars of Creation", we have been offered the option of attaining a BMPCC4k camera together with a Ronin-M gimbal back in November.
Already with Emerald Lake however, I was introduced into the use of a Ronin-1 gimbal and was shown the ropes of how to set it up and balance it properly and with a system in mind.
Now the prospect of obtaining a Ronin-M was an intriguing one for me for multiple reasons:
Gimbals become an increasingly important tool in the industry and will thus almost become a necessity to learn and use as a budding filmmaker.
Short films and with that also student film are becoming increasingly cinematic and filled with camera motion, requiring tools to help these shots advance from wieldy track and dolly shots or shaky hand-held shots.
Tracking shots currently require a really wieldy track and dolly and a lot of manpower.
So we, as a matter of nature, took the offer and waited for the Ronin-M to arrive. As such, we already had a glance and a preliminary introduction of a Ronin-M model back in December. Thus, we were able to watch it being set up by our technician demonstrator to wrap our heads around the idea of defying gravity. In January then, we had another introduction into our very own Ronin-M gimbal with the additional equipment such as a monitor, a remote control, additional batteries, case, etc.
And this is the story of how it went down:
My Objective
Since both projects for Gilly and Pillars of Creation will require the use of a gimbal – Gilly will require a series of tracking shots with turns and Pillars not requires a rather ephemeral, floating movement for the final scene, but is also very much restricted in space due to the restrictions of the set built – it was obvious from the get-go that I would have to be proficient in the setup and use of a gimbal for these projects alone. Let alone for my future employment as well as my little tech-heart.

As such, I immediately delved into researching the setup of a Ronin-M gimbal – both in theory and in practice.
My Research – Theory
As can be expected with every fancy bit of technology, there is a lot of research available online that consists of tutorials and reviews on, as well as test shoots with, the Ronin-M.
Since we will not be allowed to take the gimbal out without proving our proficiency in setting it up, I decided that I would have a couple of theory lessons in that regard before actually sitting down and trying to assemble (and balance) a gimbal myself.
As we will be using the BMPCC4k on the Ronin-M, the first resource I looked at dealt with precisely that setup to allow me a quick entrance into the subject matter:
Here, and first of all, it is really important to consider that balance is… well, a delicate matter. As we all know, even the smallest weights added to an existing equilibrium do affect balance and as such, need to be taken into consideration. As such, there will naturally not be one single setup for all cameras (or even just for any particular model), but in fact for every element (read: piece of equipment) added to the mix.
What to Look Out For
Having stated that, with gimbals, balance is so delicate, that even the weight difference of an SD-card inserted will ruin any previously established balance. Thus, it is important that this entire endeavour is only started if the camera is mounted exactly as it will be used, meaning:
There is a battery in the battery compartment
The SD-card (or C-Fast card) is in the media compartment
The relevant lens is attached
There are no movable bits left on the camera (such as straps and strap holders)
The lens cap has been taken off.
Disclaimer
In addition to that, it should furthermore be noticed that balancing gimbals (and keeping that balance) will cause less of a headache if you use prime lenses. Since prime lenses have their optical lenses firmly attached within the barrel, their weight across said barrel is also rather steady. This is however not the case with variable lenses as they do possess optical elements that move within the barrel. This needs to be considered when going for a variable lens as it might require you to either lock the variable to a certain focal length or even tape it fast.
Three Dimensions, Three Axes
Since gravity obviously takes place in 3-dimensional space, it is only sensible that any attempt to adjust the balance on a gimbal is achieved by systematically dividing space into its three different dimensions – or axes – and checking every single one of them. These available axes, namely the x-, y-, and z-axis, or – as usually referred to in the tutorials – the vertical axis, the roll axis, and the front-to-back-axis.
As shown in the video above by the manufacturer of the Ronin-M, after attaching the camera to the gimbal with a base plate, these axes are then systematically balanced in the following order:
Vertical axis (y)
Roll axis (x)
Front-to-back tilt axis (z)
Vertical Axis
The centre of gravity on this axis can be adjusted by adjusting the camera up or down along the vertical bars upon which it is mounted. Tilt the camera back at a 90° angle to check whether the camera is too front- or back-heavy. If the camera is front-heavy, it needs to be lifted up on the bars to balance it out, if it’s back-heavy, it needs to be placed further down the bars. If the camera is properly balanced on this vertical axis, it should stay in any position that is has been set to along the vertical axis without moving to its equilibrium.
Roll Axis
Much like with the vertical axis, balancing the roll axis follows the same principal. If the camera tilts to either its left or right side, it is not properly balanced: If the camera tilts to its left side, it needs to be moved along the x-axis – namely to its right – in order to find equilibrium. If the camera however tilts to its right side, the procedure is obviously reversed. However, whilst the tutorial suggests that the camera should then stay in any position given along its roll axis once fully balanced, I personally found it absolutely sufficient for the camera to tilt back into its equilibrium. This was seconded by a digital read-out of the motor within the DJI Assistant App, which read that the deviation from its optimum balance on this axis was at 0°; with a maximum of 1° being appropriate.
Front-to-back Tilt Axis (or Pan Axis)
Moving onto the front-to-back tilt axis… you will surely know the drill by now.
Or so you thought.
Remember that bit, when we attached the camera to the gimbal with a base plate? Yeah, that was essentially done on the z-axis, and just a rough assembly. For now comes the moment when we really adjust that axis and move the camera forwards (or backwards) until it does not tilt into either direction anymore and remains steady. If that first step is done, a second one follows.
In this second step, the actual pan axis is now adjusted. In order to do so, the camera is deliberately brought into an imbalance where one side is tilted higher than the other. If the camera rotates around this axis, it means that there is an imbalance that needs to be adjusted. If the camera’s front tilts from a high to a low position, it means that the camera needs to be moved towards the back, whereas if the camera’s back tilts from a high to a low position, it means that the camera needs to be moved towards the front. Perfect equilibrium is reached when the camera does not move from a higher position to a lower one.
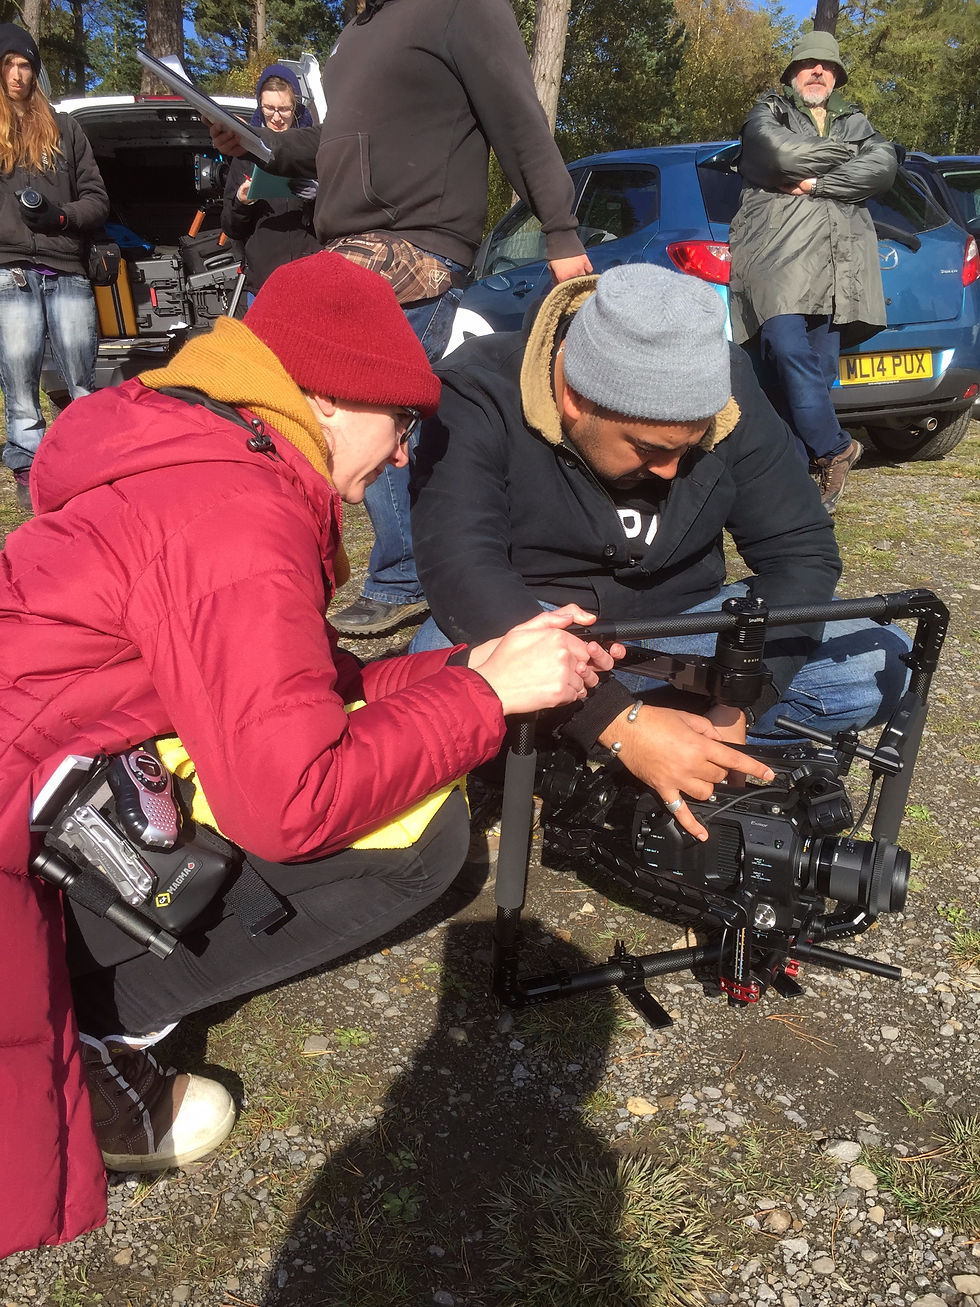
Practice – Wednesday 5 February 2020
As such, this Wednesday I was finally able to have a go at trying to balance a camera onto the gimbal. However, following the procedure as above absolved all issues I could have possibly had, making it a joyful, albeit long task to accomplish. There were no real issues and no problems to be solved as all adjustments inched me closer to the solution and it was merely an issue of systematically moving along rulers across three dimensions until the end result was done.
However, there were still some lessons to be had, which I will outline in the following:
My Own Observations
Now just from the theoretical research conducted, two aspects immediately stood out to me:
Firstly, it was immediately obvious to me that equilibrium in any direction – and lastly also in general – can only be reached if you take countermeasures to what the camera essentially moves to on the gimbal. Will say, whenever the camera leans towards a particular direction, you would need to take it to the opposite direction within space to amend the imbalance and bring the camera into balance.
Secondly, once you did a full rotation through balancing all three axes, you will inevitably have to start again at the first axis for further fine-tuning as balancing out all other axes might have an impact on the previous balance achieved.
Furthermore, and that comes in addition to my previous two findings of my theoretical research, with my practical research I understood that systematicity, accuracy, and patience is key when balancing a gimbal. Whilst I find the procedure rather therapeutic, it takes quite a while to find balance on all three axes. This will also mean that on-set balancing will require some time and practice and that this should be taken into consideration by either planning more time in on the day of the shoot, or by ideally balancing the camera a day before.
However, there is another important step that needs to be taken before you can fully operate a gimbal – and that is turning on the motor and adjusting its strength in balancing each axis – which is done by using the DJI Assistant App.
DJI Assistant App
Logging into this app and selecting the right device here not only allows you to adjust the strength of the motor, but also to kill it in case of an emergency. Since these motors are delicate, they won’t be able to counterbalance a massive amount of imbalance forever and will sooner rather than later burn out – quite literally and irreparably.
In order to avoid this however, it is recommended to check the levels by how much each axis is off of its equilibrium, whereas a deviation of up to 1° in either direction of either axis is still considered tolerable. With my attempt, the balance deviation stood as follows:
Vertical axis: +1°
Roll axis: +0°
Front-to-back tilt axis: -1°
Quite acceptable for the first time, huh?
Further Tests
As I am now allowed to take out the gimbal together with someone else from our course who is proficient in balancing it, and since time will – as always – be of the essence for our productions, I decided that I would take out the gimbal together with Has over this weekend and pre-balance the camera with all lenses that we will be using whilst noting down the respective setups and measurements across all axes.
Whilst this will not be an immediate fix, it will still allow us to save a massive amount of time in production as these set values will at least pose as an approximation to the final balance to be achieved.
However, as can be expected with everything surrounding filmmaking, we ran into issues.
Problems Arising
Due to the unsymmetrical built of the BMPCC 4k and thus the uneven weight distribution (the right side of the camera is bulkier than the left side, but the left side is heavier due to its battery chamber), the BMPCC 4k is not only heavy to its left side, but also slightly back-heavy.
Whilst you would normally push the camera towards the front to balance out the backheaviness, this is impeded due to the bulkier right side of the camera, as you can see below:

This becomes even more problematic with the specific weight of a 50mm Samyang lens. Whilst the 24mm and the 35mm lenses are heavy enough to balance out the backheaviness of the BMPCC4k, this did not hold true anymore for the 50mm. Here, we got to a point where we would have to physically push the camera into the motor in order to make this work (which it obviously does not).
So after a couple of failed attempts, we noted down that this setup was not working and moved on to the 85mm. This was slightly better as this lens was a tad heavier than the 50mm lens, but still not as heavy as the 24mm and 35mm lenses. As such, we had a slight angle at the vertical tilt that we could not counterbalance without running into the same problems as above.
However, since the slant was very minute, we consulted the DJI Assistant App and asked for a read-out of how far the balance was off, which resulted in a -18° deviation on the vertical axis, which was -17° beyond was is considered acceptable.

Jotting down the numbers just in case, and with this defeat in mind, we then changed strategy.
Has’ Ronin-S
Since Pillars of Creation will require a 180° roll turn in one of the shots (it’s when Commander Mark Zane rediscovers the Emerald Tablet that is about to turn his world view upside down) and since the Ronin-M cannot provide a 180° turn on that particular axis, Has decided to purchase a Ronin-S (okay, okay, that was not the only reason, but it provided a very good additional one for the purchase).
As such, and since we were at the task of balancing anyway, we decided to proceed onto the Ronin-S and balance all our available lenses on that as well, following the procedure as above.


However, we quickly realised that this particular gimbal was struggling with the combined weight of camera, speed booster, and lens. Here again, the shape of the BMPCC4k body made it difficult to properly balance the camera along its roll axis. Whilst Has was able to balance all the remaining axes, this particular one remained stubborn.
Finding A Solution - Counterweights!
Now being faced with the fact that two of our four lenses would not be able to work on our gimbal, we decided to venture into finding a solution online, and Has indeed found one:

With these counterweights, it would theoretically be possible to balance the camera along the roll axis by attaching the weights to the opposite side to where the camera is falling, thus freeing up more space to physically move the camera about on the gimbal itself. Or, as Has would summarise it in this video:
As such, after pre-balancing the Ronin-S for all four lenses disregarding the roll-axis, we thus decided to postpone the final balancing till the following weekend and once Has obtained the relevant counterweights for his gimbal.
Thus, the preliminary values for the respective setups are as follows:


So as you can see, there’s still a bit of work left to do before we can go into production. Until then, maintaining balance will be key.
References:
Aerial Media Pros. (2015) DJI Ronin-M - Full Setup Tutorial Under 20 Min. Unboxing | Balancing | Assistant App. [online] Available at: https://www.youtube.com/watch?v=c6ygxVcIpro [Accessed on 26 January 2020].
B&H Photo Video. (2015) Hands-On Review: DJI | Ronin-M 3-Axis Handheld Gimbal Stabilizer. [online] Available at: https://www.youtube.com/watch?v=ks_VkFGeBUI [Accessed on 26 January 2020].
DJI Tutorials. (2015) DJI Tutorials - Ronin-M Tutorials - Preparing and Balancing. [online] Available at: https://www.youtube.com/watch?v=bm3Z8VBiXaY&t=3s [Accessed on 26 January 2020].
Hidden Temple Media. (2018) RONIN S vs RONIN M (Pros & Cons). [online] Available at: https://www.youtube.com/watch?v=M0-oAN9goBg [Accessed on 26 January 2020].
Svea Hartle. (2020) Ronin-S Gimbal Research - Troubleshooting. [online] Available at: https://youtu.be/QI9fnKGzVDg [Accessed on 15 February 2020]
UglyMcGregor. (2019) How To Balance The BMPCC4K on The DJI Ronin-M. [online] Available at: https://www.youtube.com/watch?v=jmdBCHz3quM [Accessed on 26 January 2020].
YCImaging. (2017) Ultimate DJI Ronin-M Tutorial (Balancing, Motor Settings, Focusing, etc). [online] Available at: https://www.youtube.com/watch?v=Z8IRztGmm_M [Accessed on 26 January 2020].
YCImaging. (2018) Here's Why I Prefer The Ronin-M OVER The Ronin-S! [online] Available at: https://www.youtube.com/watch?v=u14yiu7C4uc [Accessed on 26 January 2020].
Comments